[Elasticsearch]데이터 처리
데이터 처리
해당 책을 지침서로 공부하며 엘라스틱서치 데이터 처리를 공부하고 기록한다.
http://book.naver.com/bookdb/book_detail.nhn?bid=8769630
시작하세요! 엘라스틱서치
[시작하세요! 엘라스틱서치]는 엘라스틱서치 검색엔진의 구조와 특징에 관해 설명하는 책이다. 책에서는 역파일 색인과 검색엔진의 개념, 클러스터와 노드로 구성된 엘라스틱서치의 시스템 구
book.naver.com
1.엘라스틱서치의 데이터 구조
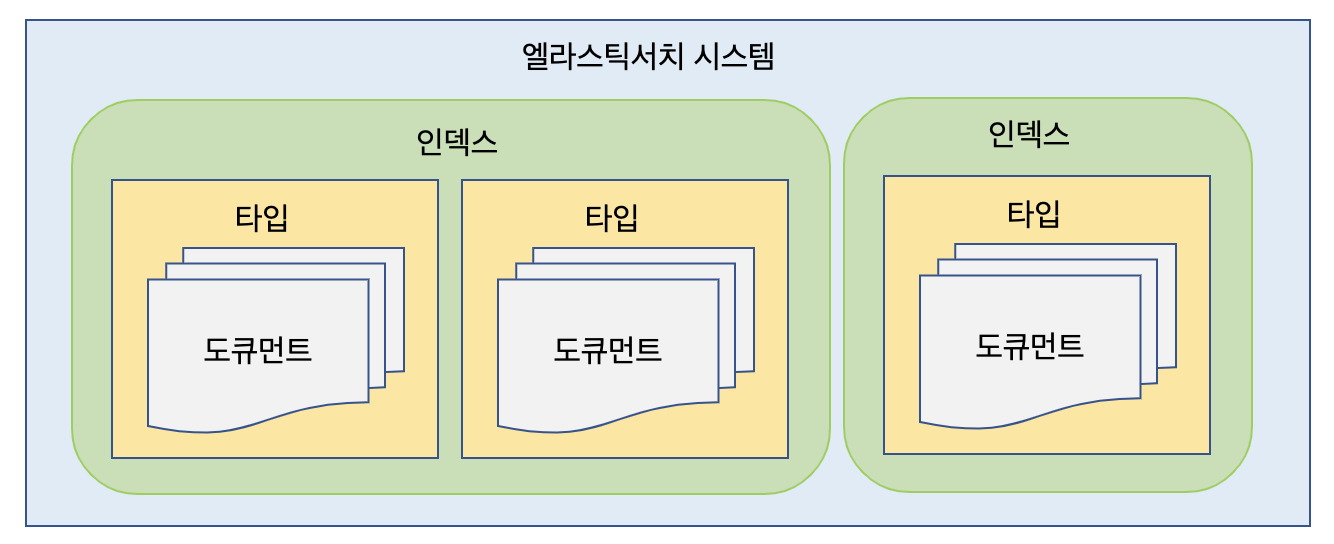
* 엘라스틱서치 데이터 구조 : 인덱스(Index), 타입(Type), 도큐먼트(Document)
- 도큐먼트 < 타입 < 인덱스 순
- 여러개의 엘라스틱서치 데이터가 저장되는 최소단위가 도큐먼트이며, 하나의 타입은 여러개의 도큐먼트로 구성, 하나의 인덱스는 여러개의 타입으로 구성되어 있다.
* 보통 관계형 데이터베이스 구조와 다음과 같이 비교된다.
| 관계형 DB | 엘라스틱서치 |
| 데이터베이스(Database) | 인덱스(index) |
| 테이블(Table) | 타입(Type) |
| 행(Row) | 도큐먼트(Document) |
| 열(Column) | 필드(Feild) |
| 스키마(Schema) | 매핑(Mapping) |
* 엘라스틱서치에 데이터 CRUD 작업을 하기위해 REST API를 이용한 curl 명령을 알아두자.
curl -X{메서드} http://host:port/{인덱스}/{타입}/{도큐먼트 id} -d '{데이터}'
- HTTP 메서드는 GET, POST, PUT, DELETE, HEAD 등이 있다.
| HTTP METHOD | CRUD |
| GET | READ |
| PUT | UPDATE |
| POST | CREATE |
| DELETE | DELETE |
2.엘라스틱서치 데이터 처리
2.1. 데이터 입력
엘라스틱서치에 데이터를 입력해보자. 엘라스틱서치 도큐먼트는 PUT이나 POST HTTP METHOD를 사용하여 입력할 수 있다.
먼저 엘라스틱 서치를 실행한다. (다음글 참고 : 엘라스틱서치 설치 및 실행)
kimchowon@gimchowon-ui-MacBookPro elasticsearch-7.10.1 % bin/elasticsearch -d
kimchowon@gimchowon-ui-MacBookPro elasticsearch-7.10.1 %
kimchowon@gimchowon-ui-MacBookPro elasticsearch-7.10.1 %
kimchowon@gimchowon-ui-MacBookPro elasticsearch-7.10.1 % ps -ef | grep elasticsearch
  501  1194     1   0  9:46PM ttys000    0:29.69 /Users/kimchowon/downloads/elasticsearch-7.10.1/jdk.app/Contents/Home/bin/java -Xshare:auto -Des.networkaddress.cache.ttl=60 -Des.networkaddress.cache.negative.ttl=10 -XX:+AlwaysPreTouch -Xss1m -Djava.awt.headless=true -Dfile.encoding=UTF-8 -Djna.nosys=true -XX:-OmitStackTraceInFastThrow -XX:+ShowCodeDetailsInExceptionMessages -Dio.netty.noUnsafe=true -Dio

  ......
실습) books라는 인덱스의 book 타입의 아이디가 1인 도큐먼트를 입력해보자.
이 도큐먼트는 4개의 필드(title, author, date, pages)를 가진다.
이때 curl -X{메서드} http://host:port/{인덱스}/{타입}/{도큐먼트 id} -d '{데이터}' 만 쓰면 아래와 같은 오류가 나올 수 있다.
{"error":"Content-Type header [application/x-www-form-urlencoded] is not supported","status":406}
그러면 맨 마지막에 -H 'Content-Type: application/json' 를 써주면 된다.
curl -XPUT http://localhost:9200/books/book/1 -d '
{"title" : "Elasticsearch Guide",
"author" : "Kim",
"date" : "2014-05-01",
"pages" : 250
}' -H 'Content-Type: application/json'


{"_index":"books","_type":"book","_id":"1","_version":1,"result":"created","_shards":{"total":2,"successful":1,"failed":0},"_seq_no":0,"_primary_term":1}%
실습) 2.1에서 실습한 데이터가 제대로 입력되었는지 GET 메소드를 이용하여 확인해보자.
정리된 json 형태로 데이터를 보려면 url 뒤에 ?pretty 를 추가한다.
curl -XGET "http://localhost:9200/books/book/1?pretty"

{
  "_index" : "books",
  "_type" : "book",
  "_id" : "1",
  "_version" : 1,
  "_seq_no" : 0,
  "_primary_term" : 1,
  "found" : true,
  "_source" : {
    "title" : "Elasticsearch Guide",
    "author" : "Kim",
    "date" : "2014-05-01",
    "pages" : 250
  }
}
_id가 1인 도큐먼트가 정상적으로 조회되는 것을 확인 할 수 있다.
id 없이 데이터를 입력할 수 도 있다. 그러면 id는 자동으로 생성된다.
curl -XPOST http://localhost:9200/books/book -d '
{"title" : "Elasticsearch Guide",
"author" : "Kim",
"date" : "2014-05-01",
"pages" : 250
}' -H 'Content-Type: application/json'


{"_index":"books","_type":"book","_id":"x46p0nYBwHyPxTAshN3k","_version":1,"result":"created","_shards":{"total":2,"successful":1,"failed":0},"_seq_no":1,"_primary_term":1}%

// _id":"x46p0nYBwHyPxTAshN3k"
위와 같이 x46p0nYBwHyPxTAshN3k 라는 id가 생성된것을 확인 할 수 있다.
주의할 점은 임의의 id로 도큐먼트를 생성할 때는 POST 메소드만 사용가능하다. PUT메소드로는 임의의 id를 가진 도큐먼트는 생성 할 수 없다.
메타 정보를 제외한 _source 필드의 데이터 값만 보려면 도큐먼트 URI 뒤에 _source를 추가한다.
curl -XGET "http://localhost:9200/books/book/1/_source?pretty"
{
  "title" : "Elasticsearch Guide",
  "author" : "Kim",
  "date" : "2014-05-01",
  "pages" : 250
}
2.2. 데이터 삭제
삭제는 도큐먼트, 타입, 인덱스 단위로 삭제 가능하다.
HTTP METHOD는 DELETE를 사용한다.
실습) 앞서 입력한 /books/book/1 도큐먼트를 삭제해보자.
curl -XDELETE http://localhost:9200/books/book/1

{"_index":"books","_type":"book","_id":"1","_version":2,"result":"deleted","_shards":{"total":2,"successful":1,"failed":0},"_seq_no":2,"_primary_term":1}%
삭제 후 조회해보면 404 not found 메시지가 뜨는 것을 확인 할 수 있다.
curl -XGET "http://localhost:9200/books/book/1/_source?pretty"
{
  "error" : {
    "root_cause" : [
      {
        "type" : "resource_not_found_exception",
        "reason" : "Document not found [books]/[book]/[1]"
      }
    ],
    "type" : "resource_not_found_exception",
    "reason" : "Document not found [books]/[book]/[1]"
  },
  "status" : 404
}
2.3. 데이터 업데이트
도큐먼트 데이터의 업데이트는 두 개의 매개 변수인 doc와 script를 이용해서 데이터를 제어할 수 있다.
doc 매개변수는 도큐먼트에서 새로운 필드를 추가하거나 기존 필드값을 변경하는데 사용한다.
script 매개변수는 좀 더 복잡한 프로그래밍 기법을 사용해서 입력된 내용에 따라 필드값을 변경하는데 사용한다.
내용만 보면 무슨 말인지 잘 와닿지가 않는다.
실습을 통해 알아보자.
실습) 새로운 필드 추가
위 실습에서 입력했던 books/book/1 도큐먼트에 doc 매개변수를 사용하여 category 필드를 추가하고 이 필드값을 "ICT"로 입력해보자.
curl -XPOST http://localhost:9200/books/book/1/_update -d '{
"doc" : {
"category" : "ICT"
}
}' -H 'Content-Type: application/json'


{"_index":"books","_type":"book","_id":"1","_version":2,"result":"updated","_shards":{"total":2,"successful":1,"failed":0},"_seq_no":4,"_primary_term":1}%
정상적으로 업데이트 되었는지 GET 메소드로 조회해본다.
curl -XGET "http://localhost:9200/books/book/1/_source?pretty"
{
  "title" : "Elasticsearch Guide",
  "author" : "Kim",
  "date" : "2014-05-01",
  "pages" : 250,
  "category" : "ICT"
}
실습) script 매개 변수를 사용하여 도큐먼트의 필드에 연산을 적용해보자.
books/book/1 도큐먼트의 현재 pages 필드값 250에 50을 더해보겠다.
* script는 MVEL 언어의 문법을 사용해서 처리된다.
MVEL은 자바 플랫폼 위에서 동작하기 위해 만들어진 언어이므로 자바 문법과 유사하게 동작한다.
_source에 있는 도큐먼트의 내용을 변경하려면 script의 ctx._source 명령을 사용한다.
curl -XPOST http://localhost:9200/books/book/1/_update -d '
{
"script" : "ctx._source.pages += 50"
}' -H 'Content-Type: application/json'


{"_index":"books","_type":"book","_id":"1","_version":3,"result":"updated","_shards":{"total":2,"successful":1,"failed":0},"_seq_no":5,"_primary_term":2}%
script 매개변수로 250에 50을 더한 후 조회해보면 300으로 변경되어 있는 것을 확인할 수 있다.
curl -XGET "http://localhost:9200/books/book/1?pretty"
{
  "_index" : "books",
  "_type" : "book",
  "_id" : "1",
  "_version" : 3,
  "_seq_no" : 5,
  "_primary_term" : 2,
  "found" : true,
  "_source" : {
    "title" : "Elasticsearch Guide",
    "author" : "Kim",
    "date" : "2014-05-01",
    "pages" : 300,
    "category" : "ICT"
  }
}
실습) 배열에 원소 추가하기.
author 필드값은 현재 Lee 인데, 이를 배열로 변경하고 배열에 이름을 하나 더 추가해보자.
이를 위해서 2가지 절차가 필요하다.
1. 현재 단순 문자열 author 필드를 배열로 변환한다.
2. 배열로 변경된 author 필드에 원소를 추가한다.
// 1. author필드를 배열로변경
curl -XPOST http://localhost:9200/books/book/1/_update -d '
{
"doc" : { "author" : ["Lee"] }
}' -H 'Content-Type: application/json'


// 2. author 배열에 Kim 문자열 추가
curl -XPOST http://localhost:9200/books/book/1/_update -d '
{
"script" : {
 "source" : "ctx._source.author.add(params.new_author)",
 "lang":"painless",
 "params":{
 "new_author":"Kim"
 }
 }
 }' -H 'Content-Type: application/json'
조회해보면 author 배열에 Lee, Kim이 있는것을 확인 할 수 있다.
curl -XGET "http://localhost:9200/books/book/1?pretty"
{
  "_index" : "books",
  "_type" : "book",
  "_id" : "1",
  "_version" : 5,
  "_seq_no" : 7,
  "_primary_term" : 2,
  "found" : true,
  "_source" : {
    "title" : "Elasticsearch Guide",
    "author" : [
      "Lee",
      "Kim"
    ],
    "date" : "2014-05-01",
    "pages" : 300,
    "category" : "ICT"
  }
}
실습) if문을 이용한 조건문 처리하기.
author필드 값에 "Kim"이 포함된 경우 pages값을 100으로, 포함되지 않는 경우 200으로 바꿔보자.
*값을 포함하고 있는지 확인할 때는 contains() 함수를 사용한다.
curl -XPOST "localhost:9200/books/book/1/_update?pretty=true" -H 'Content-Type:application/json' -d '{
"script":
{
"source":"if(ctx._source.author.contains(params.auth)){ ctx._source.pages=100} else{ ctx._source.pages=200}",
"params":{"auth":"KIM"}
}
}'
{
  "_index" : "books",
  "_type" : "book",
  "_id" : "1",
  "_version" : 6,
  "result" : "updated",
  "_shards" : {
    "total" : 2,
    "successful" : 1,
    "failed" : 0
  },
  "_seq_no" : 8,
  "_primary_term" : 2
}
실습) ctx.op 명령을 사용하여 필드 조건에 따라 도큐먼트 삭제하기.
pages값이 100이하일 때는 도큐먼트를 삭제, 그렇지 않은 때에는 아무런 처리를 하지 않는 스크립트를 작성해보자.
curl -XPOST "localhost:9200/books/book/1/_update?pretty=true" -H 'Content-Type:application/json' -d '
{"script" :
{"source" : "if(ctx._source.pages <= params.page_cnt){ctx.op = \"delete\"} else {ctx.op = \"none\"}",
"params" : {"page_cnt" : 100}
}
}'
{
  "_index" : "books",
  "_type" : "book",
  "_id" : "1",
  "_version" : 8,
  "result" : "deleted",
  "_shards" : {
    "total" : 2,
    "successful" : 1,
    "failed" : 0
  },
  "_seq_no" : 10,
  "_primary_term" : 2
}
조회해보면 "found" : false 로 도큐먼트가 삭제되어 있다.
curl -XGET "http://localhost:9200/books/book/1?pretty"
{
  "_index" : "books",
  "_type" : "book",
  "_id" : "1",
  "found" : false
}
2.4 파일을 이용한 데이터 처리
curl 명령을 이용해 데이터를 입력할 때는 입력할 데이터의 내용을 -d 뒤에 추가하는 형식으로 입력했다.
이 외에도 테이터의 내용을 미리 파일에 기입한 뒤 명령어에 @{파일명} 을 기입하는 형식으로 데이터를 입력할 수도 있다.
파일을 이용하여 데이터를 처리하는 방법을 알아보자.
실습) 파일에 기록된 데이터 입력하기.
위 실습에서 books/book/1 도큐먼트를 삭제한 관계로 조회해보면 "found":"false"가 뜨는 것을 확인 할 수 있다.
curl -XGET "http://localhost:9200/books/book/1?pretty"
{
  "_index" : "books",
  "_type" : "book",
  "_id" : "1",
  "found" : false
}
입력할 데이터가 기입된 파일을 하나 생성한다. 파일명은 book_1이다.
echo '{
"title" : "Elasticsearch Guide",
  "author" : "Kim",
  "date" : "2014-05-01",
  "pages" : 250,
  "category" : "ICT"
}' > book_1


// book_1 파일 생성
kimchowon@gimchowon-ui-MacBookPro elasticsearch-7.10.1 % ls
LICENSE.txt	README.asciidoc	book_1		data		lib		modules
NOTICE.txt	bin		config		jdk.app		logs		plugins
book_1 파일을 읽어들여 books/book/1 도큐먼트에 입력한 뒤 입력된 내용을 확인해보자.
// 파일에 내용을 읽어들여 books/book/1 도큐먼트에 입력
curl -XPOST "http://localhost:9200/books/book/1?pretty" -d @book_1 -H 'Content-Type:application/json'
{
  "_index" : "books",
  "_type" : "book",
  "_id" : "1",
  "_version" : 2,
  "result" : "updated",
  "_shards" : {
    "total" : 2,
    "successful" : 1,
    "failed" : 0
  },
  "_seq_no" : 12,
  "_primary_term" : 2
}


// 조회
curl -XGET "http://localhost:9200/books/book/1?pretty"
{
  "_index" : "books",
  "_type" : "book",
  "_id" : "1",
  "_version" : 2,
  "_seq_no" : 12,
  "_primary_term" : 2,
  "found" : true,
  "_source" : {
    "title" : "Elasticsearch Guide",
    "author" : "Kim",
    "date" : "2014-05-01",
    "pages" : 250,
    "category" : "ICT"
  }
}
2.5. 벌크(_bulk) API를 이용한 배치 작업
* 벌크(_bulk) API
- 여러 명령을 한꺼번에 실행할 수 있는 배치작업을 위해 제공하는 API
- 입력할 데이터를 한꺼번에 모아 처리. 데이터를 각각 처리하여 결과를 반환하는 것보다 속도가 빠름.
* 벌크 API 동작 종류
1) 데이터 입력
- 명령어 : index, create
- 도큐먼트가 이미 존재할 때 create 명령어를 쓰면 오류 발생.
- index 명령은 기존 도큐먼트가 존재하면 입력한 데이터로 기존 도큐먼트 내용을 덮어씀
실습) index 명령어를 사용하여 books/book/1과 books/book/2 두 개 도큐먼트를 동시에 생성해보자.
curl -XPOST 'http://localhost:9200/_bulk?pretty' -H 'Content-Type:application/json' -d '
{"index" : {"_index":"books", "_type":"book", "_id":"1"}}
{"title" : "Elasticsearch", "author" : "Kim", "pages" : "250"}
{"index" : {"_index":"books", "_type":"book", "_id":"2"}}
{"title" : "Elasticsearch Easy Guide", "author" : "Lee", "pages" : "300"}
quote> '


{
  "took" : 47,
  "errors" : false,
  "items" : [
    {
      "index" : {
        "_index" : "books",
        "_type" : "book",
        "_id" : "1",
        "_version" : 3,
        "result" : "updated",
        "_shards" : {
          "total" : 2,
          "successful" : 1,
          "failed" : 0
        },
        "_seq_no" : 13,
        "_primary_term" : 3,
        "status" : 200
      }
    },
    {
      "index" : {
        "_index" : "books",
        "_type" : "book",
        "_id" : "2",
        "_version" : 1,
        "result" : "created",
        "_shards" : {
          "total" : 2,
          "successful" : 1,
          "failed" : 0
        },
        "_seq_no" : 14,
        "_primary_term" : 3,
        "status" : 201
      }
    }
  ]
}
books/book/1 과 books/book/2를 모두 조회해본다.
// books/book/1
curl -XGET "http://localhost:9200/books/book/1?pretty"
{
  "_index" : "books",
  "_type" : "book",
  "_id" : "1",
  "_version" : 3,
  "_seq_no" : 13,
  "_primary_term" : 3,
  "found" : true,
  "_source" : {
    "title" : "Elasticsearch",
    "author" : "Kim",
    "pages" : "250"
  }
}


// books/book/2
curl -XGET "http://localhost:9200/books/book/2?pretty"
{
  "_index" : "books",
  "_type" : "book",
  "_id" : "2",
  "_version" : 1,
  "_seq_no" : 14,
  "_primary_term" : 3,
  "found" : true,
  "_source" : {
    "title" : "Elasticsearch Easy Guide",
    "author" : "Lee",
    "pages" : "300"
  }
}
처리할 동작이 많을 때는 명령을 일일이 입력하는 방법보다는 입력하거나 처리할 데이터를 한 파일에 입력해 놓고 벌크를 이용하여 처리하는 방법이 훨씬 효과적이다. 아래 실습을 해보자.
실습) 댜음 내용들을 담은 파일로 데이터 벌크 처리해보자.
<파일 내용>
- books/book/1 도큐먼트를 delete 명령으로 삭제한다.
- books/book/2 도큐먼트를 update 명령으로 "date":"2014-05-01" 필드를 추가한다.
- 신규 도큐먼트 books/book/3를 생성한다. 도큐먼트 내용은 {"title":"Elasticsearch Guide 2", "author":"Park", "pages":"400"}
// bulk_1 파일 생성 및 입력
echo '
{"delete" : {"_index":"books", "_type":"book", "_id":"1"}}
{"update" : {"_index":"books", "_type":"book", "_id":"2"}}
{"doc" : {"date":"2014-05-01"}}
{"create" : {"_index":"books", "_type":"book", "_id":"3"}}
{"title":"Elasticsearch Guide 2", "author":"Park", "pages":"400"}' > bulk_1


// 파일로 데이터 벌크 처리
curl -XPOST 'http://localhost:9200/_bulk?pretty' -H 'Content-Type:application/json' --data-binary @bulk_1
{
  "took" : 26,
  "errors" : false,
  "items" : [
    {
      "delete" : {
        "_index" : "books",
        "_type" : "book",
        "_id" : "1",
        "_version" : 4,
        "result" : "deleted",
        "_shards" : {
          "total" : 2,
          "successful" : 1,
          "failed" : 0
        },
        "_seq_no" : 15,
        "_primary_term" : 3,
        "status" : 200
      }
    },
    {
      "update" : {
        "_index" : "books",
        "_type" : "book",
        "_id" : "2",
        "_version" : 2,
        "result" : "updated",
        "_shards" : {
          "total" : 2,
          "successful" : 1,
          "failed" : 0
        },
        "_seq_no" : 16,
        "_primary_term" : 3,
        "status" : 200
      }
    },
    {
      "create" : {
        "_index" : "books",
        "_type" : "book",
        "_id" : "3",
        "_version" : 1,
        "result" : "created",
        "_shards" : {
          "total" : 2,
          "successful" : 1,
          "failed" : 0
        },
        "_seq_no" : 17,
        "_primary_term" : 3,
        "status" : 201
      }
    }
  ]
}